Triggers
Overview of trigger configuration in Streamer.bot
Introduction
The release of Streamer.bot 0.2.0 included a large overhaul to the events system, with the introduction of Triggers.
You now have more control over events and their execution through Trigger configuration options, and events can now trigger more than one action.
Triggers also introduced the ability to easily test your actions!
Configuration
To activate the triggers pane, you must first select an action by clicking on it in the main actions pane.
Right-Click anywhere in the triggers pane (or click the + icon in the top right) to browse triggers and add them to your selected action.
Types
You will notice several core types of configuration options when setting up your triggers, outlined below:
Basic
These triggers require no additional configuration.
For example, the Streamer.bot Started Trigger always executes on initial startup of Streamer.bot with no additional configuration needed.
Toggle
Checkbox configuration can be used to filter incoming triggers based on multiple event types, which can be toggled on or off.

For example, the Twitch Subscription Trigger allows you to toggle incoming trigger events for each subscription tier.
Select
Dropdown configuration can be used to filter incoming triggers based on preexisting values.

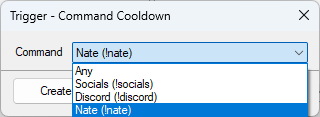
For example, the Command Cooldown Trigger allows you to filter incoming trigger events for specific commands.
These triggers also include the option Any, which allows events to trigger on any of the included options.
Range
Range configuration is used for filtering incoming numeric triggers based on minimum and maximum values.

For example, the Twitch Cheer Trigger allows you to filter incoming trigger events for a specified bit range.
Min and Max values are inclusiveMax is set, the trigger will execute on exact values matching the configured MaxLeave both Min and Max blank to trigger on all values.
Text
Text field configuration can be used to filter incoming triggers based on arbitrary text values.

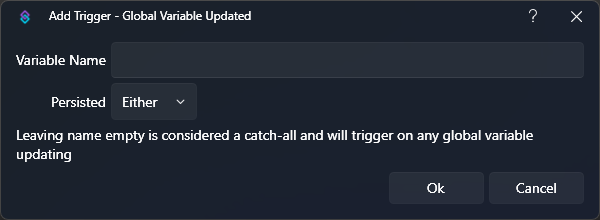
For example, the Global Variable Updated Trigger allows you to filter incoming trigger events based on a specified variable name.
This field can be left empty to trigger on all values.
Context Menu
Right-Click any existing trigger to reveal additional context menu options:
Test Trigger
Send a test execution of the selected trigger
Edit Trigger
Open the configuration dialog for the selected trigger
Copy Trigger
Copy the selected trigger to the clipboard
Base64 string intended to be pasted into other actions, but it can also be sent to notepad or any other computer to be imported into another instance of Streamer.botPaste Trigger
Paste a copied trigger into the selected action
Delete Trigger
Delete the selected trigger
This will show a confirmation dialog by default
Enabled
Toggle this trigger on or off.
Refresh Triggers
Reload criteria data for all triggers
Clear All Triggers
Remove all triggers from the selected action
Enable All Triggers
Enable all triggers for the selected action
Disable All Triggers
Disable all triggers for the selected action
Always Run
Always execute this trigger, even if another matching trigger has been configured elsewhere with an overlapping range.
For example, if you have a Twitch Cheer Trigger setup to execute on any value, and another setup to execute on exactly 100 Bits:
- Enabling
Always Runwill allow both triggers to execute - Disabling
Always Runwill only execute theAnytrigger if the bit value does not equal 100 Bits
Always Run by their blue colorViewer
You can click the ? icon in the top-right of the triggers panel to open the Trigger Viewer
This window gives you a quick overview of all your configured triggers and their action mappings.
Testing
You can use triggers to easily test your actions and their behavior against various arguments.
The quickest way to execute a trigger is by selecting Test Trigger from the context menu.
For more control over variables while testing, you can use the Core > Test Trigger utility to define custom arguments, or send Simulated Events
Simulated Events
Simulated Events documentation needed (Coming in Streamer.bot v0.2.2)
Advanced
Custom Triggers
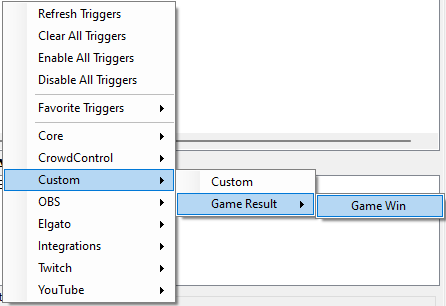
You can define your own triggers using C# Code. These will then show up in the trigger menu UI under Custom once the C# code defining them has been run once.
public void Init() method and enable Precompile on Application start.
// Register a new trigger labeled "Game Win" in the "Game Result" category
//                           Label         Name                 Category
CPH.RegisterCustomTrigger("Game Win", "gameResultWin", new[]{"Game Result"});
// Trigger the "Game Win" trigger using its name
CPH.TriggerCodeEvent("gameResultWin", true);
The category parameter of the RegisterCustomTrigger function always has to be an array, allowing to nest sub-categories.
This is only for user convenience and does not change the process of triggering a custom trigger by name.

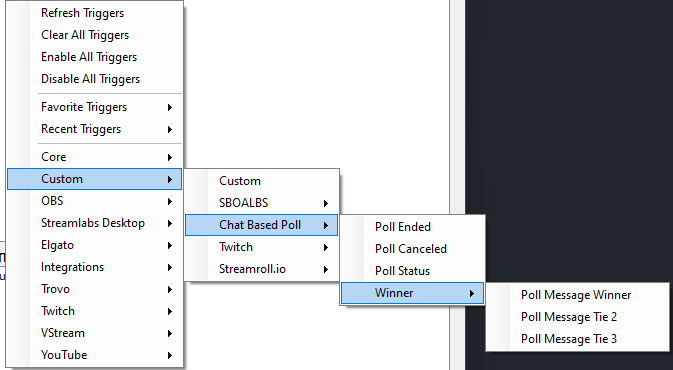
// Register three top level triggers in category `Chat Based Poll`
CPH.RegisterCustomTrigger("Poll Ended", "poll_ended", new[] {"Chat Based Poll"});
CPH.RegisterCustomTrigger("Poll Canceled", "poll_canceled", new[] {"Chat Based Poll"});
CPH.RegisterCustomTrigger("Poll Status", "poll_status", new[] {"Chat Based Poll"});

// Register three nested triggers in category `Winner`, which is in category `Chat Based Poll`
CPH.RegisterCustomTrigger("Poll Message Winner", "poll_winner_one", new[] {"Chat Based Poll", "Winner"});
CPH.RegisterCustomTrigger("Poll Message Tie 2", "poll_winner_two", new[] {"Chat Based Poll", "Winner"});
CPH.RegisterCustomTrigger("Poll Message Tie 3", "poll_winner_three", new[] {"Chat Based Poll", "Winner"});
// Call a trigger from any nested level solely by their name
CPH.TriggerCodeEvent("poll_ended", true);
CPH.TriggerCodeEvent("poll_winner_three", true);