AI Chat Command
Create a basic AI chat command with Ollama and Python
Whipstickgostop
You can utilize the Run a Program sub-action to execute scripts with Streamer.bot
Requires Streamer.bot v0.2.5-beta.2 or later
A bug in previous versions of Streamer.bot prevented capturing of
A bug in previous versions of Streamer.bot prevented capturing of
stdout from scriptsPrerequisites
- Install Python
Ensure you have the latest version of Python 3 installed on Windows - Add Python to $PATH
Make sure you have added python to your PATH environment variable and you are able to executepythonfrom cmd.
If you installed Python through the Windows Store, this should be done automatically. - Install Ollama
Ensure you have the latest version of Ollama installed on Windows
Instructions
- Download llama3.1 model
For this example, we are going to load up the latestllama3.1model inollama:Command Promptollama run llama3.1 - Create our Python script
In our Streamer.bot folder, navigate todataand then create ascriptsdirectory.Streamer.bot\data\scripts\ollama-example.pyimport sys import ollama # Load the prompt from command line arguments prompt = " ".join(sys.argv[1:]) # Generate text using llama3.1 model response = ollama.generate(model="llama3.1", prompt=prompt) # Print the response as a single line, truncated at 500 characters output = response["response"].replace("\n", " ") print(output[0:499]) - Install the ollama python package
From ourscriptsdirectory in Windows Explorer, Right-Click and open the current location in terminal.Command Promptpip install ollama
This will install the ollama python package to allow our script to interact with ollama. - Create a Chat CommandIn Streamer.bot, navigate to the Commands tab
- Set the
Nameto anything you'd like, such as!ollama - Add a command to the
Commandslist:!ollama - Uncheck the
Ignore Internal Messagesoption- This will allow us to use our command from the Streamer.bot chat window!
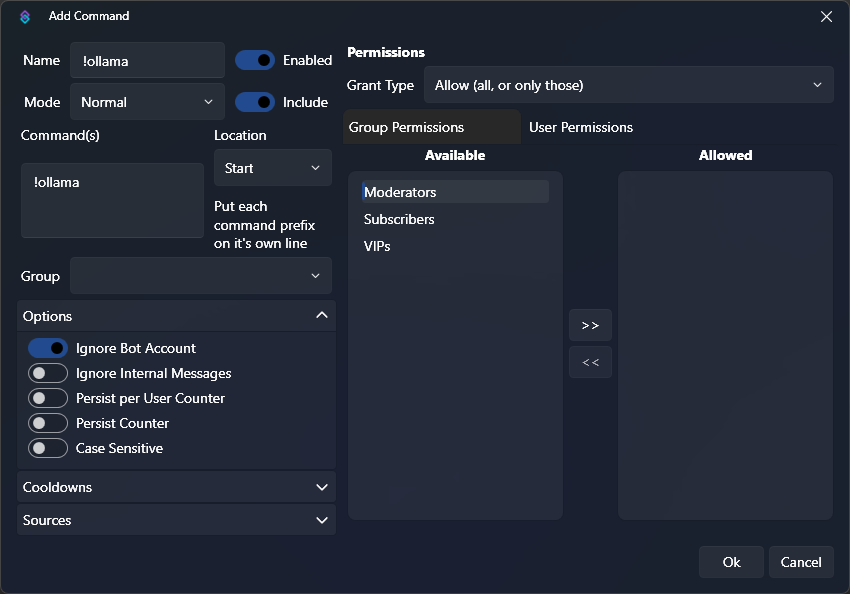 Command Configuration
 - Set the
- Create our ActionIn Streamer.bot, navigate to the Actions tab
- Create a new action, we are going to name ours
Ollama Example - Add a Trigger,
Core > Commands > Command Triggered - Select the
!ollamacommand we just created
- Create a new action, we are going to name ours
- Configure Sub-Actions
- Add a Run a Program sub-action
Core > System > Run a ProgramTarget:pythonWorking Directory:path\to\Streamer.bot\data\scriptsArguments:ollama-example.py %rawInput%- Note that we are adding the
%rawInput%variable as a python argument.
This contains the command input from the user, and will allow our python script to read it!
- Note that we are adding the
Wait:1- This must be set to a value greater than 0!
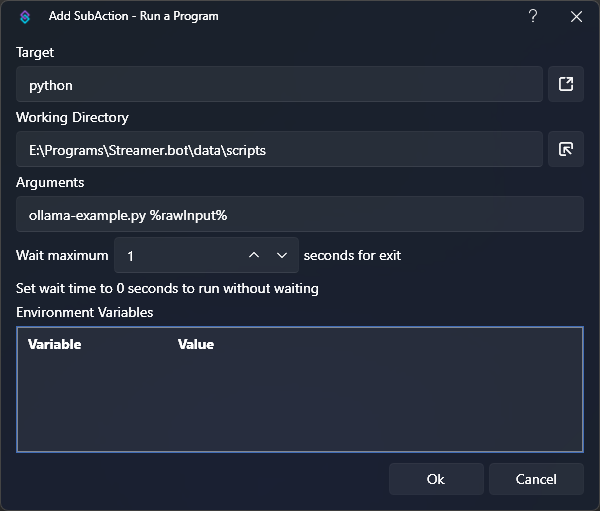 Run a Program Sub-Action
 - Add a Send Message to Channel sub-action
Twitch > Chat > Send Message to Channel- Choose whether you want to send the message from your
BotorBroadcasteraccount - Set the
Messagevalue to%output0%- This variable will contain the first line of output from our python script!
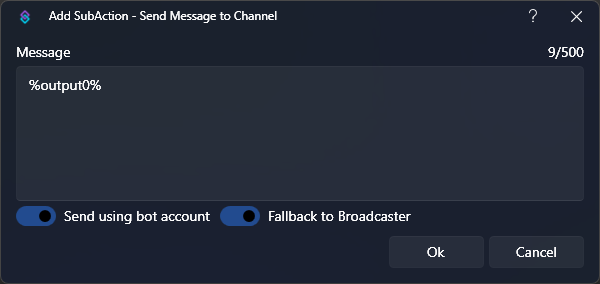 Twitch Send Message Sub-Action
- Add a Run a Program sub-action
- Done!
When you are finished, everything should look something like this: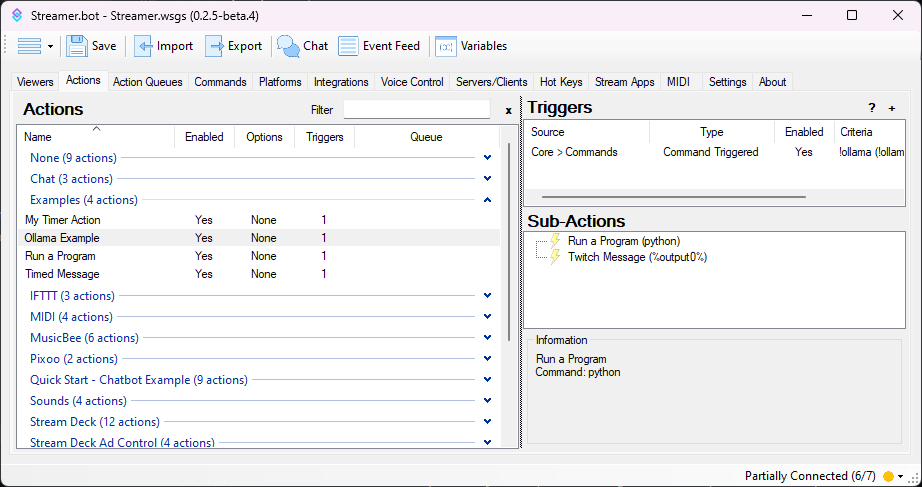 Ollama Action OverviewYou can now test out the
!ollamacommand in chat! Ollama Command Chat Preview
Import Code
Import this code into your Streamer.bot to have the command and action (mostly) set up for you!
Import Code
U0JBRR+LCAAAAAAABAClVsuO2zYU3QfIP7gGZhcaetpWdqk7aWfVotMmizgLPq40xEikysfYxmD+vaQetmXJRpEuxXN1eHnOvZd8ff9uNptXYPD84+zVf7hPgStwn/PfyxJXeLZ5wma2kVWFBZt/6GKwNU9S+aivT7zWhtPnQmoj62PECyjNpfAh4SJYBEeAgaaK16YDzynln1Z8oh0ibFn2WMUFr2z15cjpQY+9NRFzhgcnwA2Hdivf2pVZDzUwZ37jGBiBLAlRHmUBSmJYI7zEgIJVQMOMxHECYZ9c89s/FiwME2vWQWBSguc0ysIA2dPSMvisZPUbd+qogwvKcakHURd63+9xVZcw2LpQ0tY+pgP1AMXlDh+0026KXTnbZHVUdYRTKahVCoSZQo3iReFUP5fyQs6OpamPh0bZPAhZACmgdI0pStIcI0LCNQoJi3AchWnC8vMDnJlCgeYpTpcoSHGIkpBGKCPLGFGCgxhCFkercPSrOdRewCQIL5Gr1pzs0X2lfD9H304f3wdSjyvrhhz+RPXBdYoY5YxVYSsnuqeay8Z5BK25i/owu1N49yBqa+5Gf+6keuai+IU37Xf/cbv9Q8lC4Upvt49GgasmtSDSbLe+K7bbttv0iAfEyxfcOPv6NtoDc/NZqvs991URB9NmLdfO0TR2xjqjUZKt1oikUY5CTDLCKM4DiMfpAy+ePKubCVeMXF6u9+V/0XndMW5ZzAWDvd9sYO6HW94Z2Pv05nfSGmdAMHagVpCDaxn2iVJpm8a5ohBZLWmeMFe/a7ZGSR6nKFuyDOU0iVdRlJFwRX5EoXAE/H+Jwv9e/7/6zdqmGY4SV8e1BnaG93BH2Me3w3RA0TfN1bGtpVUURr0XXEm1BlVxY4D9rbsBNg1fOQz/oVF2HOY/tT09wE4+jOYsF81NMXGHVLJZDoZCH8fL1D4KCtjf7+uSU242uDZWwdSmpaS4uxYG9LwQUsHP0pzq+zKrNuRBGFACl1Pktb+rtdl4AlA3Irw9N6Io1vAIQnPDXyZPUZSS4HIjZcnkbnQW27BPY8db9eKuxcL81fZZcK18d0C0pM9gHkG9XJTXCdyUvBvxJ9Dwqo8/e8CcXktda7vLqZbKlad/PPgcg0W0SBFxT7VF0uY7fhU1QUkbtJy/f/f2L14ggMXgCQAA Don't know how to import this code into Streamer.bot? Check out the Import & Export Guide!
You will still need to create the python script, and update the working directory of the Run a Program sub-action accordingly.
Tips & Tricks
This is just a basic example, but it can be improved in many ways.
- Twitch chat messages are limited to 500 characters or less.
If your prompt generates more than 500 characaters worth of output, it will currently be truncated.
The script could be modified to split output into multiple lines, for Streamer.bot to read in separately. Alternatively, Streamer.bot could be used to split the output into separate messages.