Execute Scripts
Integrate Python, Javascript, or other scripts into your Streamer.bot actions
You can utilize the Run a Program sub-action to execute scripts on the fly.
This can be great if you are more comfortable in another language, such as Python or Javascript, and less comfortable in C#.
Streamer.bot's built-in C# Code sub-actions are much more powerful, as a first-class integration, but you can still do a lot with some quick scripts in other languages!
Be;pw, we are going to showcase some basic ways you can use this functionality.
Basic Math
With node you can quickly evaluate inline scripts using node -e
Similarly, in python you can use python -c
In this example, we are going to use node to do a basic addition of two Streamer.bot variables
- Add a Test trigger
You can use any variables you want, but for this example we are going to populate%value1%and%value2%: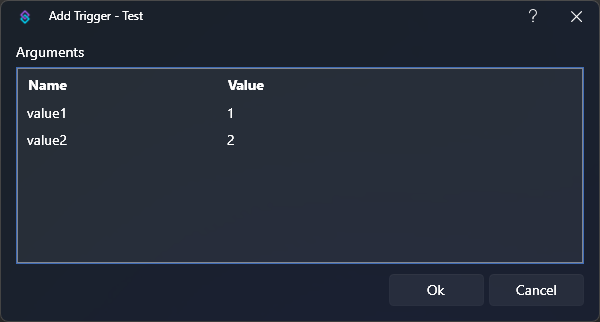 trigger preview
 - Configure your sub-action
To add together the two variables, we will use Javascript.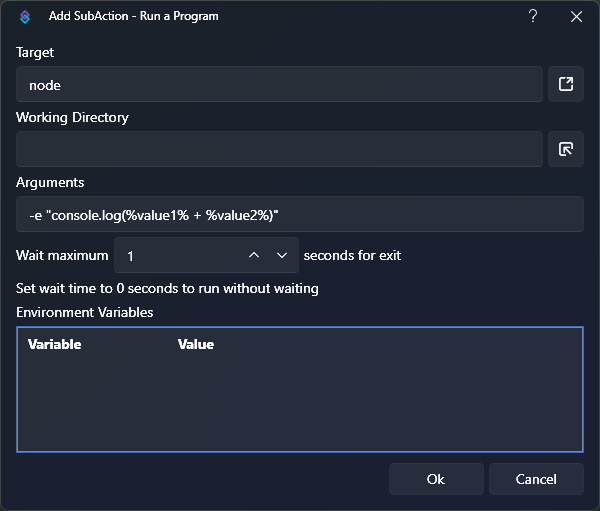 sub-action preview
- Target:
node - Arguments:
-e "console.log(%value1% + %value2%)" - Wait:
1
You must set theWaitparameter to a value greater than zero in order to get output from scripts - Target:
- Run the action
Execute the test trigger to run the action - Read Output
If you browse toAction Queues > Action Historyand inspect the variables for the action execution, you will seeoutput#variables were populated from the executed script.The result of our simple math equation will be available in%output0%!
HTTP POST Requests
Streamer.bot ships with a Fetch URL sub-action, but it can only send GET requests.
In this example, we will use node to send POST requests with variable data.
- Create your script
We are going to place the following script,fetch.js, inside the<YOUR_STREAMERBOT_DIR>/data/scriptsdirectory.
If you don't already have ascriptsdirectory, feel free to create it place your scripts whereever you'd like!fetch.jsconst url = process.env.URL; fetch(url, { // Default to GET, override if provided in environment variables method: process.env.METHOD || 'GET', headers: { // Default to applicaton/json, override if provided in environment variables 'Content-Type': process.env.CONTENT_TYPE || 'application/json', }, body: process.env.DATA, }).then(response => { // Send the response status code to %output0% console.log(response.status); // Send the response body to %output1% // If the response is not JSON, you can use .text() instead of .json() // We are just making sure we un-prettyify the JSON response to place it on a single line of output response.json().then(data => console.log(JSON.stringify(data))); }); - Configure your sub-action
 sub-action preview
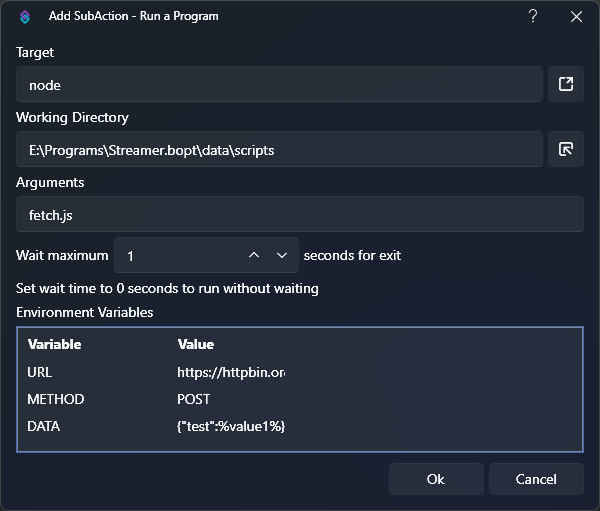
- Target:
node - Working Directory:
<path/to/your/scripts/directory> - Arguments:
fetch.js - Wait:
1 - Environment Variables:
This is where we will pass any data, including variables, to our script.Name Value Description URLhttps://httpbin.org/postExample URL, useful for testing METHODPOSTSend a HTTP POST request DATA{ "test": %value1% }Example JSON data containing variables
- Target:
- Run the action
Execute the test trigger to run the action - Read Output
If you browse toAction Queues > Action Historyand inspect the variables for the action execution, you will seeoutput#variables were populated from the executed script.If successful, the status code200be available in%output0%Any response data, in this case a JSON string, will be available in%output1%
Discord Webhook Embeds
By extending the HTTP POST request example, you can create custom Discord Webhooks with your own embeds.
- Create your scriptdiscord-webhook.js
const data = { "embeds": [ { "title": "Hello, world!", "description": "This is an embed, sent from Streamer.bot, via a NodeJS sub-action!", "color": 36863, "fields": [ { "name": process.env.FIELD_1_NAME, "value": process.env.FIELD_1_VALUE, }, { "name": process.env.FIELD_2_NAME, "value": process.env.FIELD_2_VALUE, } ], "author": { "name": "Streamer.bot", "url": "https://streamer.bot", "icon_url": "https://streamer.bot/logo-transparent.png" } } ], }; const url = process.env.WEBHOOK_URL; fetch(url, { method: 'POST', headers: { 'Content-Type': 'application/json', }, body: JSON.stringify(data), }).then(response => { // Send the response status code to %output0% console.log(response.status); }); - Configure your sub-action
 sub-action preview
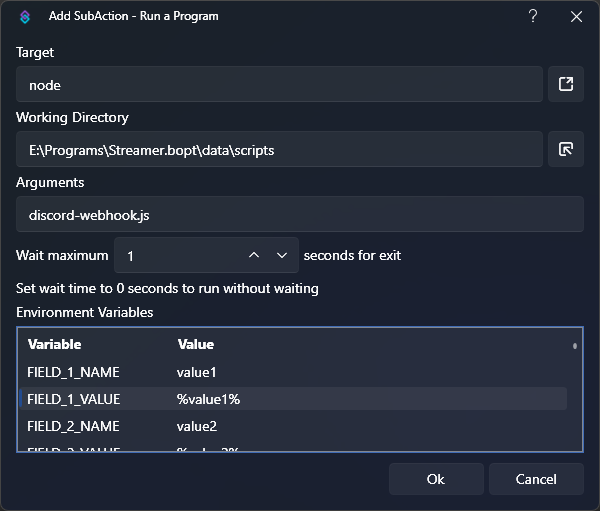
- Target:
node - Working Directory:
<path/to/your/scripts/directory> - Arguments:
fetch.js - Wait:
1 - Environment Variables:
This is where we will pass any data, including variables, to our script.Name Value Description FIELD_1_NAMEvalue1Label for embed field 1 FIELD_1_VALUE%value1%Value of embed field 1, loaded from variable FIELD_2_NAMEvalue2Label for embed field 2 FIELD_2_VALUE%value2%Value of embed field 2, loaded from variable WEBHOOK_URL<secret webhook url>Find in Discord channel settings -> Integrations
- Target:
- Run the action
Execute the test trigger to run the action - Read Output
If you browse toAction Queues > Action Historyand inspect the variables for the action execution, you will seeoutput#variables were populated from the executed script.If successful, the status code204be available in%output0%
This is a very basic example and could be expanded further to allow variable customization over the entire webhook structure.