Visual Studio Code
Configure Visual Studio Code for writing C# code for Streamer.bot with linting and autocomplete.
This extension automates the process of setting up a Streamer.bot C# project directory with IntelliSense, while also providing hover documentation for CPH methods. Installation includes the base C# extension dependency.
Streamer.bot C# Extension for Visual Studio Code
Write Streamer.bot C# code with IntelliSense and documentation
by FajitaOfTreason
This tutorial provides a general step-by-step guide on setting up Visual Studio Code (VS Code) for writing C# code for Streamer.bot.
By following these instructions, you'll be able to write code with linting, which will help you catch errors early and ensure your code compiles before copying into Streamer.bot
Prerequisites
Setup Guide
Create a new Streamer.bot Project Folder
File > Open Folder from the menu bar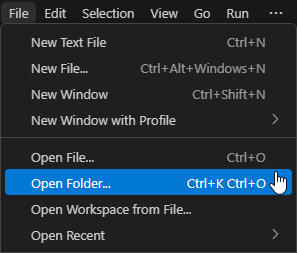
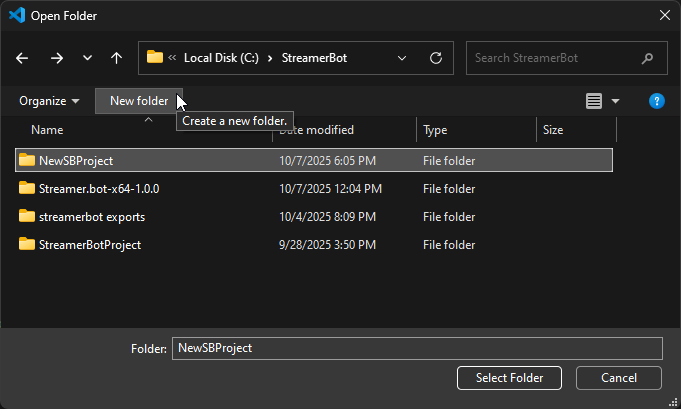
Select an existing empty folder, or create a new project folder, and then select it to open:
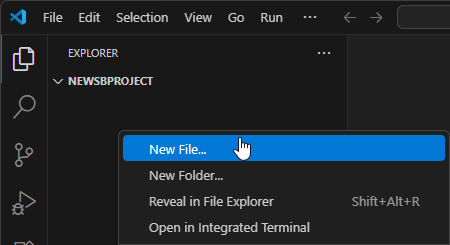
Create a .csproj File
Explorer view by selecting View > Explorer from the menu bar, or use the shortcut ⇧E- Create a new file by right-clicking in the
Explorerpane and selectingNew Filefrom the context menu:
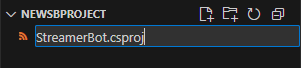
- Name the file, ending with
.csproj
- Paste the contents from the code block below into your new
.csprojfile:
<Project Sdk="Microsoft.NET.Sdk">
  <PropertyGroup>
    <TargetFramework>net481</TargetFramework>
    <LangVersion>13.0</LangVersion>
    <Nullable>enable</Nullable>
    <UseWPF>true</UseWPF>
    <DefineConstants>EXTERNAL_EDITOR</DefineConstants>
    <NoWarn>CS0114</NoWarn>

    <!-- Set the following directory with your Streamer.bot install location -->
    <StreamerBotPath>C:/path/to/streamer.bot-directory</StreamerBotPath>
  </PropertyGroup>
  <ItemGroup>
    <!-- Automatically include in every CS file -->
    <Using Include="Streamer.bot.Plugin.Interface" />
    <Using Include="Streamer.bot.Plugin.Interface.Model" />
    <Using Include="Streamer.bot.Plugin.Interface.Enums" />
    <Using Include="Streamer.bot.Common.Events" />

    <!-- Use forward slashes for cross-platform compatibility -->
    <Reference Include="$(StreamerBotPath)/Streamer.bot.Plugin.Interface.dll" />
    <Reference Include="$(StreamerBotPath)/Streamer.bot.Common.dll" />
    <Reference Include="$(StreamerBotPath)/Twitch.Common.dll" />

    <Reference Include="$(StreamerBotPath)/NAudio*.dll" />
    <Reference Include="$(StreamerBotPath)/Wpf*.dll" />
    <Reference Include="$(StreamerBotPath)/Newtonsoft.Json.dll" />
    <Reference Include="$(StreamerBotPath)/System.*.dll" />

    <Reference Include="System.Web" />
    <Reference Include="System.Net.Http" />

    <!-- Uncomment the following line to reference all DLLs in the streamerbot directory -->
    <!-- <Reference Include="$(StreamerBotPath)/**/*.dll" /> -->
  </ItemGroup>
</Project>
- Replace the value of the
<StreamerBotPath>xml tag to point to your Streamer.bot directory and save the file.
StreamerBot.csproj- This file includes the Streamer.bot using statements in every
.csfile automatically - This file configures the project as a
.NET Framework 4.8.1project - To point to your own Streamer.bot DLLs, replace the contents of
<StreamerBotPath>with the path to your own Streamer.bot directory (containingStreamer.bot.exeand.dllfiles) ::
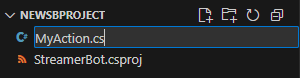
Create a .cs File
Explorer view by selecting View > Explorer from the menu bar, or use the shortcut ⇧ECreate a new file ending with the .cs extension. This is the file we will use for our C# Code action:
Paste the C# Code Example below into your .cs file, replacing UniqueClassName with your filename
using System;

/*----- Class name should match <filename>.cs -----*/
#if EXTERNAL_EDITOR
public class UniqueClassName : CPHInlineBase
#else
public class CPHInline
#endif
/*--------------------------------------------*/
{
    public bool Execute()
    {
        // Add your code here
        return true;
    }
}
.cs Notes
- This is similar to the default code found in the
Execute C# Codesubaction - The first four lines are required in VS Code, but are used by default and not needed in Streamer.bot
- The
#if EXTERNAL_EDITORpreprocessor directive is set to true by the.csprojwe just created, but is not active in Streamer.bot's editor.- In VS Code, each class name in a project must be unique, so changing
UniqueClassNameto the FileName avoids conflicts, while explicitly inheriting fromCPHInlineBase, the class which provides theCPHinstance all of our Streamer.bot methods belong to. - In Streamer.bot, the class must be called
CPHInline, which automatically inherits fromCPHInlineBase.
- In VS Code, each class name in a project must be unique, so changing
::
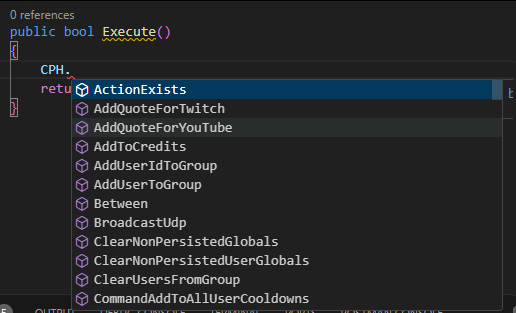
- You can now type
CPH.and it will automatically give you the availableCPHmethods- This uses the
Streamer.bot.Plugin.Interface.dllin your Streamer.bot folder - The advantage of this is that you will have an up-to-date list of methods, classes, and enums available ::
- This uses the
Debugging
While writing your code, you can check for compilation errors in theProblems view.Problems panel by navigating to View > Problems or use the shortcut ⇧M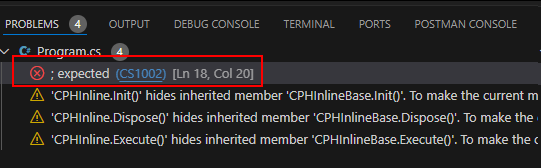

Copying Code to Streamer.bot
When you code is ready to run in Streamer.bot, you can copy it into an Execute C# Code sub-action.Select your Action
Actions panel- Create or select an existing action
- Add or select an
Execute C# Codesub-action
Copy your C# Code
- You can copy the entirety of your
.csfile into Streamer.bot's C# code editor.
- Make sure the code compiles successfully by clicking
Compile - Click
Save and Compile
(are you missing an assembly reference?), click Find RefsExecute C# Code Sub-Action and is ready to run in your Action!::
Additional Steps
These steps are optional, but can help speed up your workflow.
File Template Snippet
To make creating new .cs files easier, you can create a workplace snippet that will fill in the Streamer.bot C# sub-action template code for you.
Command Palette with ⇧P and select Snippets: Configure Snippets
Select the option to create a new snippets file for the current workspace, and enter a filename like sbSnippets:

Replace the contents of your new .code-snippets file with the code below:
{
  "Execute C# Sub-Action Template": {
    "scope": "csharp",
    "isFileTemplate": true,
    "prefix": "streamer.bot-file-template",
    "description": "New Execute C# Sub-Action for Streamer.bot",
    "body": [
      "using System;",
      "",
      "/*----- Class name should match FileName -----*/",
      "#if EXTERNAL_EDITOR",
      "public class ${TM_FILENAME_BASE} : CPHInlineBase",
      "#else",
      "public class CPHInline",
      "#endif",
      "/*--------------------------------------------*/",
      "{",
      "    public bool Execute()",
      "    {",
      "        ${0:// Add your code here}",
      "        return true;",
      "    }",
      "}"
    ]
  }
}
- After creating new .cs files, you can now fill them with the snippet by either typing
sbfile, and selecting thestreamer.bot-file-templatefrom the dropdown, or by runningSnippets: Fill File with Snippetfrom the Command Palette ::